
User Tools
Table of Contents
Input Options
Before your game can work you need to link the key from Unity's Input Manager to UFE.
Input Manager: UFE is compatible with 4 different input options.
- Unity Input Manager: UFE will attempt to use Unity's default Input Manager. UFE comes with a pre-designed InputManager (located under Project Settings). You can find a copy of this file under the
ProjectSettingsfolder. - cInput (3rd party required): UFE will attempt to load cInput 2.0 if you have it installed. For more information on how to use its references check out their reference manual.
- Rewired (3rd party required): UFE will attempt to load Rewired. For more information on how to install this plugin click here.
- Control Freak (3rd party required): Allows the use of mobile control for player 1. A prefab example of Control Freak usage is provided under the ThirdPartyAssets folder. For more information on Control Freak click here.
- Custom Class: Use this option to create your own inherited input class. You can also use a component available under UFE called “GUIControlsInterface.cs”. Just create a new game object in your hierarchy with the component, then add it to your UFE Manager. Hit the play button and you will see GUI buttons representing controls for player 1. For more information, refer to this forum post.
Force Digital Input: If disabled, UFE will apply horizontal forces relative to analog input sensitivity.
Confirm Button: Choose which of the control buttons will be used to confirm options under menus.
Cancel Button: Choose which of the control buttons will be used to cancel/go back under menus.
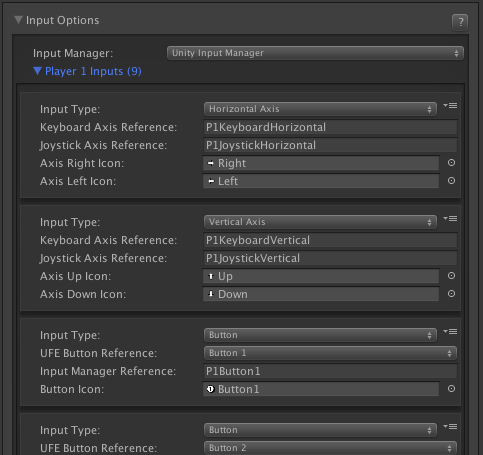
Player Inputs (Unity Input Manager)
These values must match with the values under Unity's default Input Manager. If you correctly installed UFE, the inputs registered in the demo file should match with the Input Settings.
Input Type: Select if this input is an Axis or a button.
- Horizontal Axis: Must match an element under the Input Manager with
Axisset to X Axis. - Vertical Axis: Must match an element under the Input Manager with
Axisset to Y Axis. - Button: Must match a button registered under the Input Manager with
Typeset to Key or Mouse Button.
(Axis) Keyboard Axis Reference: The name of the related Axis under the Input Manager. Make sure Type is set to Key or Mouse Button.
(Axis) Joystick Axis Reference: The name of the related Axis under the Input Manager. Make sure Type is set to Joystick Axis.
(Button) Input Manager Reference: The name of the related Axis under the Input Manager. Make sure Type is set to Key or Mouse Button.
(Image) Axis/Button Icon: The image corresponding to axis direction or button pressed. This is used in debug mode for onscreen display of inputs. For more information check out this article.
Control Freak (Mobile Controls)
For more on Control Freak visit their website.
Control Freak 1.x
- Import Control Freak to your project.
- Switch the input manager on Input Options to Control Freak. You will see a new option:
Control Freak Preferences. Unfold it. - Drag one of the 2 presets from
UFE\ThirdPartyAssets\Control-Freak-1to the Prefab option: CF-UFE-2Buttons (2 buttons) or CF-UFE-4Buttons (4 buttons). Use the Inspector to adjust these files to your liking. - Run the game. The mobile controls will control player 1.
Control Freak 2.0
- Import Control Freak 2 to your project.
- A pop-up will ask you to update the Input Manager. Proceed with the installation.
- Under
Plugins\Control-Freak-2\Add-Ons\click onCF2-UFE.unitypackageand import it to your project. - Switch the input manager on Input Options to Control Freak. You will see a new option:
Control Freak Preferences. Unfold it. - Drag one of the presets from
UFE\ThirdPartyAssets\Control-Freak-2\Prefabs\to the Prefab option. Use the Inspector to adjust these files to your liking.
- To have it working on Android you need set the Scripting Backend in your Build → Player Settings to IL2CPP. For more on that check out this post.
- For more on exporting to Android click here.
- For more on exporting to iOS click here.
Special Notes
- By default, UFE will always attempt to load Unity's default input manager.
- If cInput is installed you will see a new option under the options menu inside the game: Change Controls. This will attempt to load the default cInput GUISkin. You will find this file under the cInput templates folder.
- Each player must have both Horizontal Axis and Vertical Axis defined.
- If you are using Unity's Input Manager, you must set the Joystick Axis reference as well.
- Make sure you link the buttons to buttons and axis to axis.
Code access:
UFE.config.player1_Inputs
UFE.config.player2_Inputs
Code example:
// Full code example: .\UFE\Engine\Scripts\Core\UI\Base\CharacterSelectionScript.cs
// Change from Keyboard to Joystick
foreach (InputReferences inputRef in UFE.config.player1_Inputs){
	if (inputRef.inputType == InputType.HorizontalAxis){
		if (inputRef.inputButtonName == "P1KeyboardHorizontal")
			inputRef.inputButtonName = "P1JoystickHorizontal";
	}else if (inputRef.inputType == InputType.VerticalAxis){
		if (inputRef.inputButtonName == "P1KeyboardVertical")
			inputRef.inputButtonName = "P1JoystickVertical";
	}
}